I am back!! :)
Today we look at the stitching technique used in Chamba rumal embroidery.
Before that, a disclaimer - I am not an authority on Chamba rumals. If anyone knows better about this method please feel free to correct me.
Ok, let us continue..
If we look closely at the stitches samples of Chamba, we'll come across different styles of filling -such as the long and short stitch , encroaching stitch and brick stitch. But technically, if you use these stitches, the back of the embroidery will not be an exact replica of the front which is essential in the case of Chamba rumals.
So, one needs to stitch in such a way that it looks like satin, long & short,encroaching or brick on both sides. And the only stitch that can do it is the Darning stitch.
The above stitched samples represent the different ways the darning stitch can be used to fill patterns. The style of filling is the choice of the embroiderer. Vertical, horizontal or even random directions!!
Now, let us look at my not so perfect sample. It took me a while to get used to the fact that I should be concerned about the design at the back too.
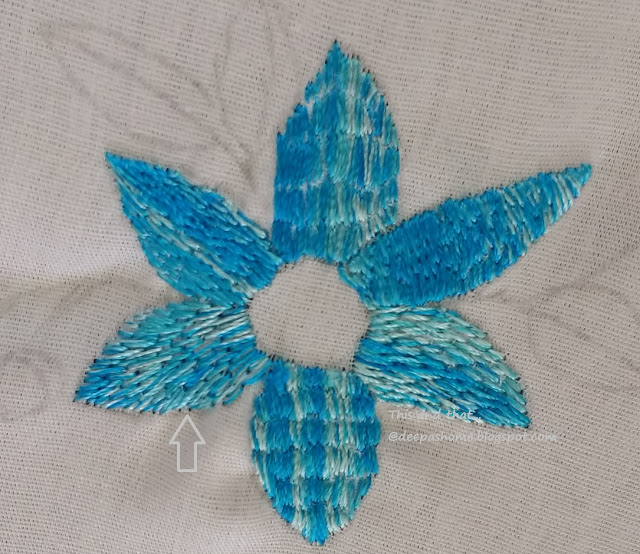
Except for one petal which is just the normal long and short filling, all others are with darning stitch.Can you guess??

Here is the picture again and an arrow shows the normal long and short one !! :) Just across that awfully pointed horizontally filled petal.All other petals are filled in the Chamba rumal style.
Now for the stitching technique. I am sure everyone knows the darning stitch. In this case, all you have to do is not to knot in the beginning or in the end and always remember to keep an eye on the reverse side too. We are not experts, so this may take a little practice and the lack of it shows on my piece here. My daughter is not too impressed with it and doesn't want me to post such an ugly flower :)
Start with a waste knot and a tiny back stitch and then use the running stitch.

Return to the base along the same line filling the gaps with another series of running stitches.The first back stitch will be covered by the subsequent darning stitches.
 So, here is the completed trial flower. It's not an exquisitely embroidered piece - but will suffice for a sampler.


Note to YouTubers - I've discovered that some of you have copied my tutorials and patterns and reproduced them on your channels as your own. These are the results of hours of hard-work and research.I cannot stop you from remaking the stitch or technique tutorials, but please give credit where credit is due.
Today we look at the stitching technique used in Chamba rumal embroidery.
Before that, a disclaimer - I am not an authority on Chamba rumals. If anyone knows better about this method please feel free to correct me.
Ok, let us continue..
If we look closely at the stitches samples of Chamba, we'll come across different styles of filling -such as the long and short stitch , encroaching stitch and brick stitch. But technically, if you use these stitches, the back of the embroidery will not be an exact replica of the front which is essential in the case of Chamba rumals.
 |
| Image credit : http://www.isca.in/FAMILY_SCI/Archive/v2/i7/1.ISCA-RJFCCS-2014-012.pdf |
So, one needs to stitch in such a way that it looks like satin, long & short,encroaching or brick on both sides. And the only stitch that can do it is the Darning stitch.
The above stitched samples represent the different ways the darning stitch can be used to fill patterns. The style of filling is the choice of the embroiderer. Vertical, horizontal or even random directions!!
Now, let us look at my not so perfect sample. It took me a while to get used to the fact that I should be concerned about the design at the back too.
Except for one petal which is just the normal long and short filling, all others are with darning stitch.Can you guess??

Here is the picture again and an arrow shows the normal long and short one !! :) Just across that awfully pointed horizontally filled petal.All other petals are filled in the Chamba rumal style.

Now for the stitching technique. I am sure everyone knows the darning stitch. In this case, all you have to do is not to knot in the beginning or in the end and always remember to keep an eye on the reverse side too. We are not experts, so this may take a little practice and the lack of it shows on my piece here. My daughter is not too impressed with it and doesn't want me to post such an ugly flower :)
Start with a waste knot and a tiny back stitch and then use the running stitch.

Return to the base along the same line filling the gaps with another series of running stitches.The first back stitch will be covered by the subsequent darning stitches.


The front..

The other side...
So, that's it from my end.
I'll see you around,
Love,luck and sunshine,
Deepa


0 Comments