For all those who wanted to know how the kutch work pattern with mirror was stitched,here's the tutorial. I have tried to show most of the steps,but since this pattern is slightly different from the usual,you may have to put your thinking cap on and use a little bit of your logic too.
Oh, and one more thing - Iam not showing the mirror fixing here.Once you learn the stitching part, you can just tack the mirror down in the middle of the pattern and do the weaving and interlacing as usual.
Oh, and one more thing - Iam not showing the mirror fixing here.Once you learn the stitching part, you can just tack the mirror down in the middle of the pattern and do the weaving and interlacing as usual.
Since there are a lot of pictures, I've divided the tutorial into two parts. In Part 1 I will teach the frame and in Part 2 I will show the interlacing.
Shown below is the pattern diagram. I've numbered each corner in the order of stitching. If you look at the picture, you'll find that there are three boxes (1 to 8, 9 to 16 and 17 to 24)

 I've used all the six strands of anchor stranded cotton for the stitching. 6 strands gives a nice filled look to the pattern. But it is entirely your choice.
Kutch work is essentially weaving and interlacing. The point that you need to remember here is that in weaving we always have to pass the threads in the over and under sequence.
Let us start.
Step 1 : Come up at point 1 as shown in the picture below.You can see that I've not come up at the exact corner of the square,instead it is slightly below the actual corner of the square.
I've used the diagram for comparison and I've also marked the relevant points.
I've used the diagram for comparison and I've also marked the relevant points.

Step 2 : Go down at 2 and come up at 3. Again note that I do not go down at the exact corners. You can imagine that the sides of the squares are extended a bit.
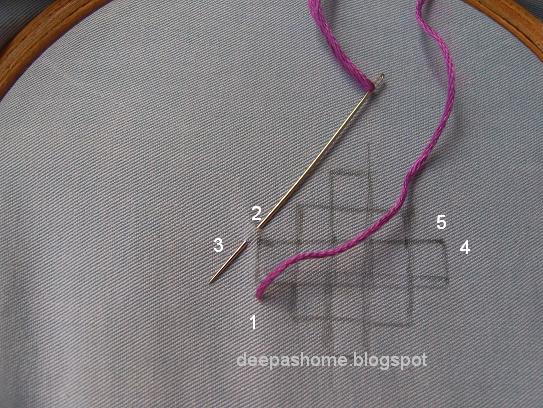
Step 3 : Go down at 4 and come up at 5.

Step 4 : This is where the weaving logic starts. From 5 ,you have to go to 6 and come up at 7. Note the horizontal thread marked with black arrow . It went over the thread from 1 to 2 ,so its sequence will be as shown in the picture below.
 Step 5 : Follow the same logic from 7 to 8. Go down at 8 and you'll get the first rectangle.
Step 6 : Now come up at point 9. To go to 10 ,you have to weave through the existing threads. Have a look at the horizontal thread marked with black. It is passing under the thread from 1 to 2 (first step) . So now it should pass over the thread from 9 to 10.
 Step 7: Weave in the below mentioned sequence.
 Step 8 : Go down at 10 and come up at 11.
 Step 9: Go down at 12 and come up at 13
 Step 10 : To go to 14, repeat the weaving sequence.
 Step 11 : Come up at 15 and go across to 16. The square is complete. Come up at 17 to start the next rectangle.
 Step 12 : Weave across to 18 and come up at 19. Go across to 20 and come up at 21.
Step 13 : Weave to 22 and come up at 23. Complete the rectangle by going across to 24

This completes the basic frame for this particular pattern. I hope the explanation is clear. I've not learnt Kutch work and this pattern has been worked out entirely by me. Hence I am not sure if I am breaking any basic rule of this form of embroidery. If I've gone wrong somewhere please do let me know.
I'll be posting the pictures of interlacing in the next post.
Till then,
Love,luck and sunshine,
Deepa


0 Comments